Apple released the latest macOS 10.15 Catalina in the fall of 2019 and it has been criticized a lot as an OS full of annoying bugs. One of the bugs that users complained most is that the Mac computer refused to boot up after upgrading to macOS 10.15.
It’s quite unpleasant situation when your Mac can’t finish booting up. It may stick to the loading bar or a folder with a question mark on the screen.
Is your Mac safe? Are your files safe?
Sit back and relax. There are easy ways to save your Mac and your important files on it.
Why is the Mac not booting up after the macOS upgrade?
When the Mac is upgrading to a newer system, drivers, kernel programs, configured utilities, file systems, user interface, hard drive partitions, and other information will be updated. Generally speaking, a major system upgrade will give the user better experience and better security for their data.
However, after the upgrade, the non-updated software is no longer compatible with the new system. As a result, the Mac doesn’t start up successfully. It happens often when the Mac is upgrading to a much newer system. Not only a major system upgrade but a minor software update may screw up the Mac and make it unbootable.
Another reason is that the startup volume has some corruption, which made the installation of new macOS fail. Since the new macOS was not fully installed, the Mac is not starting up correctly.
Why is restoring files important?
Before you proceed to the solutions, you need to keep your files safe first. The reason is that the solutions explained below might delete your important files or overwrite your files to make them corrupted. Therefore, it is suggested to get the files off the Mac before you fix the issue if you don’t have a backup of the needed information.
Many software supports creating a bootable disk on another good Mac using an empty removable external drive. Then you can boot up the Mac through the bootable disk and restore the files.
Recently we found another software that can get the files off Mac directly in Recovery Mode by running a command line, instead of using a bootable disk. The software is called iBoysoft Data Recovery for Mac. Go to this post to know the detailed instructions and additional solutions to unbootable Mac issue.
How to make the Mac boot?
After securing the information, the next step is to boot up your Mac successfully for use. Of course, you can go to nearby Apple store for help, but why not try the following solutions to save the trip?
Solution 1: Fix the startup disk in Recovery Mode
First Aid in Disk Utility can not only check and repair errors on external storage but also repair the errors on Mac’s hard drive. But it needs to be run in Recovery Mode for Mac’s HD.
Steps to boot the Mac into Recovery Mode (also called macOS Recovery) and fix the startup disk:
- Restart the Mac and hold down Command + R immediately.
- Release the key until you see the Apple logo.
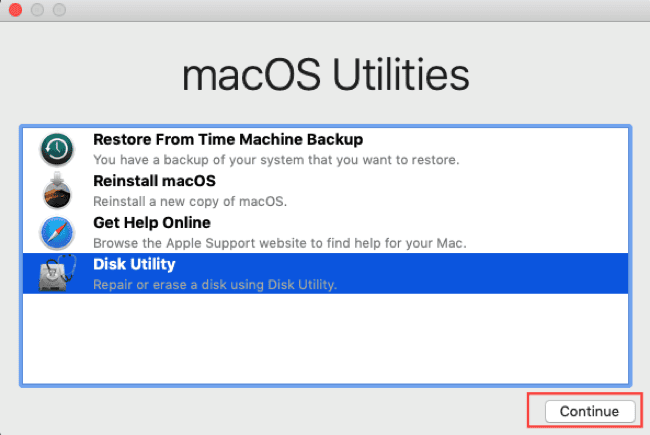
- Choose Disk Utility in macOS Utility menu which contains Restore From Time Machine Backup, Reinstall macOS, Get Help Online and Disk Utility.
- Click Continue and then select the macOS startup disk which is often labeled “Macintosh HD”.
5. Click First Aid and then click Run.
Solution 2: Downgrade macOS 10.15 to previous version
It is natural to come up with this solution. Now that the Mac is unable to run macOS 10.15, it is a good idea to make the Mac workable by rolling back to the previous state. You can go to Apple’s support page to follow the instructions or know the steps below.
- Restart the Mac into Recovery Mode by pressing down Command + R before the Mac starts to boot. Command + R keys will lead you to reinstall the latest macOS that was installed on your Mac. For example, if the Mac was running macOS 10.14 Mojave before upgrade, the instructions here would bring the Mac back to macOS 10.14.
- Release the keys until you see an Apple logo.
- Format the Mac startup volume to avoid possible failure in downgrading due to startup disk corruption by using Erase in Disk Utility from Recovery Mode. When formatting, you have to choose a compatible file system for the macOS. For instance, if you are going to roll back to macOS 10.14/10.13, choose APFS as the Format. Choose Mac OS Extended as the Format for macOS 10.12 and earlier OS X versions.
- Go back to macOS Utilities and choose Reinstall macOS. The thumbnail will be the system your Mac will go back to.
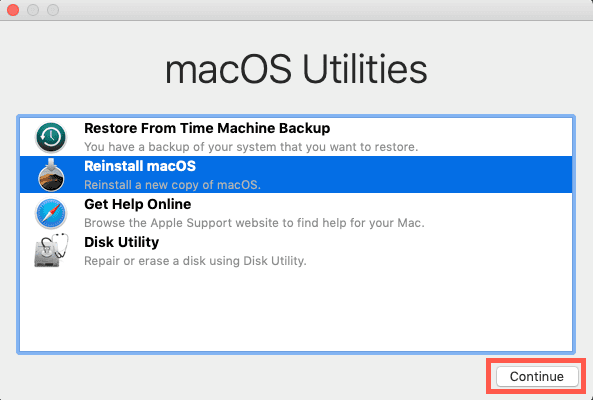
5. Follow the wizard to finish the reinstallation.
Another way to go back to the earlier state is easier if you have Time Machine backup. You connect the backup drive to the Mac and choose Restore From Time Machine Backup in the macOS Utilities menu. Then select a version to restore and wait the computer automatically finishes the work.
Final note
You can manage the issue successfully by yourself. However, if you are not confident or those solutions don’t work, feel free to go to Apple store to ask for help from professionals.