
If you’re using a Blue microphone, Blue Sherpa is the software you need. It helps fine-tune your audio settings for gaming, podcasting, or music to provide a clear and professional sound.
Through this guide, you’ll find how to leverage Blue Sherpa to maximize your Blue microphone’s capabilities.
Start improving your audio quality today!
What is Blue Sherpa?
Blue Sherpa is a user-friendly software developed by Blue Microphones designed to optimize the control and settings of Blue’s USB microphones. Boasting an intuitive interface, it allows users to tweak microphone gain, adjust headphone volume, select pickup patterns, and more.
Features and Functionality
Blue Sherpa software provides a variety of features to enhance the user’s audio experience:
- Microphone Gain Control: Adjust the sensitivity of the microphone to sound.
- Headphone Volume Control: Manage the headphone volume linked to the microphone.
- Pickup Patterns: For audio capture, select patterns (like cardioid, omnidirectional, and bidirectional).
- Firmware Updates: Keeps your microphone’s firmware up-to-date and improves compatibility and performance.
- Mute Functionality: The user can mute the microphone directly via the software interface.
- Live-Level Monitoring: Visualize how loud the input sound is through a sound level meter.
These features unlock the full potential of Blue microphones, providing superior sound quality and a deeply customized audio experience.
Blue Sherpa Software Supported Devices and Platforms
| Supported Devices/Platforms | Compatibility |
|---|---|
| Blue Yeti Microphones | Fully supported: Yeti, Yeti Pro, Yeti X, Yeti Nano |
| Mac Platform | Compatible with OS X (10.11 or higher) |
| Windows 10/11 Platform | Compatible with Windows 10 and Windows 11 |
Blue Sherpa Vs G HUB
Blue Sherpa and Logitech G HUB are software that manages and controls digital devices. Sherpa is specifically tailored to Blue Microphones, while G HUB is more universal, designed to handle a wide range of Logitech’s gaming hardware.
Blue Sherpa:
Advantages:
- Designed specifically for Blue microphones, ensuring optimal compatibility and control
- User-friendly interface
- Allows for microphone gain control, pattern selection, and headphone volume adjustment
Limitations:
- Limited to Blue Microphones devices
- Requires updates to stay compatible with new models
G HUB:
Advantages:
- Provides control over a wide range of Logitech’s gaming devices
- Allows for custom macros and commands
- Integration of third-party applications for greater functionality
Limitations:
- It is not specifically designed for microphones, so some specific brands like Blue might have limited compatibility compared to Sherpa
- More complex interface due to its versatility
Deciding between Blue Sherpa and G HUB depends on the devices you intend to use. Blue Sherpa will provide more in-depth control if you’re exclusively using Blue microphones, whereas G HUB would be a better choice if you have a wide range of Logitech devices.
How to Use Blue Sherpa: A Step-by-Step Guide?
Step 1: Download Blue Sherpa
First, you’ll need to download the software from Blue’s official website. Visit Logitech G – Downloads to download Blue Sherpa.
Step 2: Install Blue Sherpa
After the software has been downloaded:
- For Windows: Locate the .exe file in your downloads and double-click on it to begin installation. Follow the on-screen prompts to complete the process.
- For Mac: Locate the .dmg file in your downloads and double-click to open it. Drag the Blue Sherpa icon to your Applications folder.
Step 3: Connect Your Microphone
The installed software lets you connect your Blue Yeti or Blue Snowball to your computer using a USB cable. The microphone should appear in the Blue Sherpa interface if connected correctly.
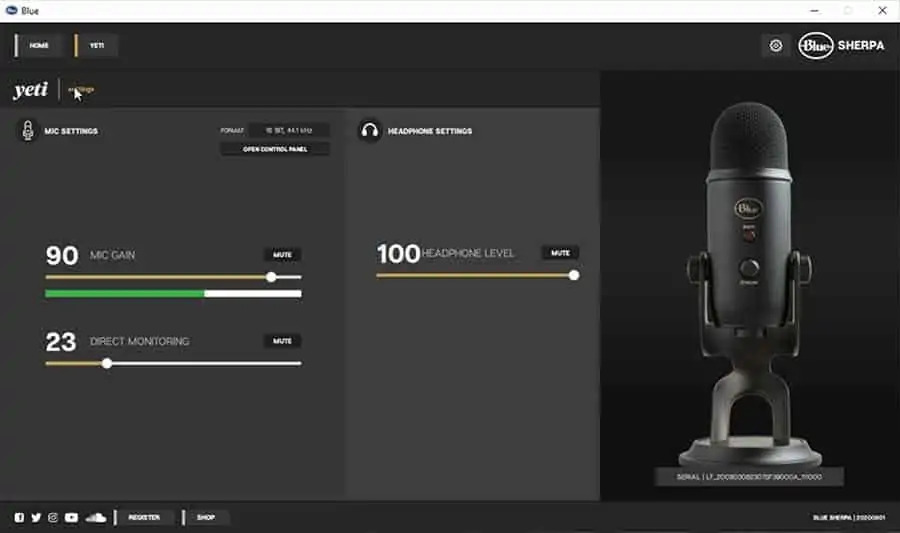
Step 4: Navigating the Interface and Main Features
- Device Selection: If you have multiple compatible devices connected to your computer, they will appear as icons on the top of the interface. Click on the device you want to adjust the settings for.
- Microphone Gain Control: A slider that adjusts the sensitivity of your microphone to sound inputs.
- Headphone Volume Control: If your microphone has a headphone jack, you can control the output volume using this slider.
- Polar Pattern Selection: You may have multiple polar patterns depending on the microphone model. Click on the symbol that represents the desired pattern.
- Mute Control: A button that toggles the mute function on and off.
- Firmware Updates: Blue Sherpa also lets you update your microphone’s firmware. If an update is available, a notification will appear in the interface.
Step 5: Adjusting Microphone Settings With Blue Sherpa
- Adjust Gain: Use the gain slider to adjust the microphone’s sensitivity to sound. Try adjusting this setting if your input is too quiet or loud.
- Adjust Headphone Volume: Use the headphone volume slider to change the audio output volume if your microphone has a headphone jack.
- Change Polar Pattern: If your microphone has multiple polar patterns, click on the symbol representing the desired pattern to adjust how your microphone picks up sound.
And voila! You’ve now navigated and adjusted your microphone settings using Blue Sherpa. Adjusting your settings can significantly impact your sound quality, so experiment to find what works best.
Final Thoughts
To conclude, using Blue Sherpa can make your Blue microphone sound even better.
You don’t have to use the normal settings – with Blue Sherpa, you can change them to fit exactly what you need.
Want better-sounding audio for your videos or music?
Then download Blue Sherpa. Use the steps I have written above to help you set it up. Get started with Blue Sherpa and hear the difference today!


