In the game Satisfactory, where being smart and tidy is super important, players usually pay attention to the big, obvious buildings and machines that make their factories run.
But there’s one building that often gets overlooked, even though it’s really useful: the Radar Tower.
In this article, we’ll take a closer look at the Radar Tower, talking about what it does, how to unlock it, what you need to build it, and finally answer the big question: Is it actually worth using?

The Basics of the Radar Tower
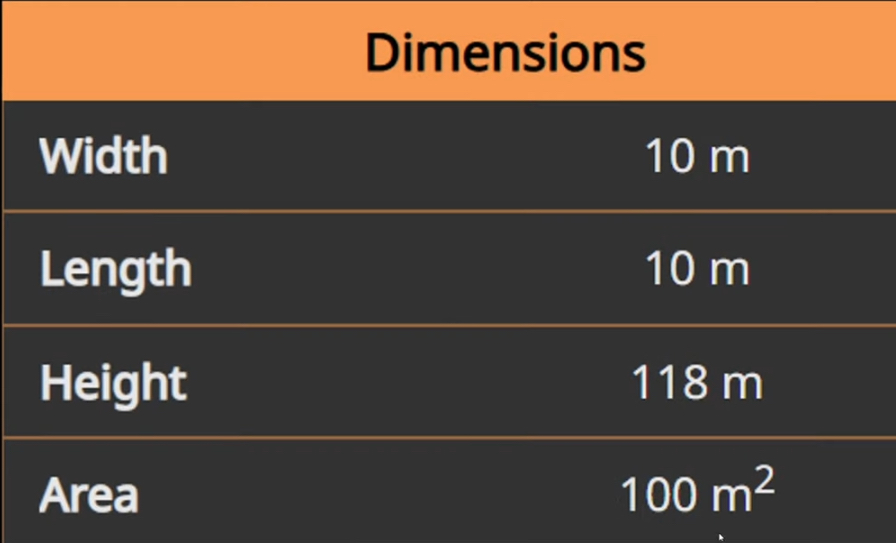
Standing at an impressive 118 meters tall, the Radar Tower holds the title of the tallest buildable structure in Satisfactory, second only to the Space Elevator.
Its footprint is relatively small, measuring 10 meters in length and width, which theoretically allows it to fit on a single foundation.
However, in practice, it slightly exceeds this limit, making it challenging to place multiple towers directly adjacent to each other.
The Radar Tower consumes 30 Megawatts of power, equivalent to the energy requirements of a single refinery or about seven and a half constructors or smelters.
This power consumption is an important factor to consider when planning your factory’s energy infrastructure.
Unlocking the Radar Tower

Unlike many other structures in Satisfactory, the Radar Tower cannot be unlocked through the HUB.
Instead, players must progress through the M.A.M. (Molecular Analysis Machine) research tree, specifically in the Quartz tab. The unlock sequence is as follows:
- Quartz
- Quartz Crystals
- Crystal Oscillators
- Radar Tower
To unlock the Radar Tower, players need to invest significant resources in the M.A.M.:
- 50 Crystal Oscillators
- 50 Heavy Modular Frames
- 50 Computers
This substantial investment underscores the importance of automating the production of Heavy Modular Frames and Computers well before reaching this stage of the game.
Construction Requirements
Once unlocked, building a Radar Tower requires:
- Computers
- Heavy Modular Frames
- Crystal Oscillators
- Cable
The exact quantities aren’t specified in the provided information, but it’s clear that these components are crucial for the tower’s construction. You are advised to have automated production lines for these items to facilitate easier construction of multiple Radar Towers.
The Power of the Radar Tower
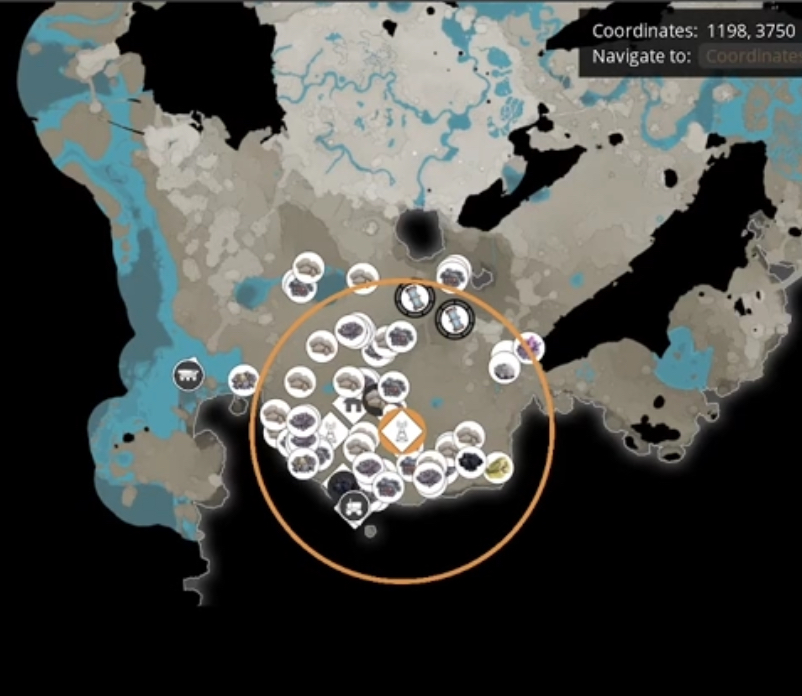
When connected to the power grid, the Radar Tower reveals its true potential. It scans a large circular area around itself, providing valuable information about the surrounding environment. This information includes:
- Resource Nodes: The tower highlights all nearby resource nodes, including copper, iron, limestone, coal, and even resource wells.
- Node Purity: By hovering over a node on the map, players can see whether it’s impure, normal, or pure, allowing for better planning of resource extraction.
- Node Status: The tower indicates whether a node has been claimed (i.e., has a miner placed on it) or is still available for use.
- Special Items: The Radar Tower can locate various special items within its radius, including:
- Somersloops
- Power Slugs
- Mercer Spheres
- Crash Sites
- Hard Drives (after researching the appropriate technology in the M.A.M.)
- Flora and Fauna: The tower provides information about local plant life (such as berries and nuts) and potential threats from wildlife.
Accessing Radar Tower Information
You can access the information gathered by Radar Towers in two ways:
- Directly at the tower: By interacting with the Radar Tower, players can view all the information it has gathered about its surrounding area.
- Through the map: By pressing ‘M’ to open the map and selecting the ‘Resources’ tab, players can see all the information gathered by all Radar Towers in their world.
Maximizing Radar Tower Efficiency
To make the most of Radar Towers, consider the following tips:
- Spacing: Since the scan radius is quite large, it’s more efficient to space out your Radar Towers rather than clustering them together.
- Naming: You can rename your Radar Towers (e.g., Radar1, Radar2, etc.) to keep track of their locations more easily.
- Systematic exploration: Use the Radar Towers to systematically explore and collect resources in your world. As you collect special items like hard drives, the count on the tower’s display will decrease, helping you track your progress.
The Verdict: Is the Radar Tower Worth It?
Considering all its features and benefits, the Radar Tower is undoubtedly a valuable addition to any Satisfactory playthrough. Here’s why:
- Resource Mapping: It provides comprehensive information about all nearby resource nodes, their purity, and availability.
- Special Item Location: The tower helps locate crucial items like power slugs and hard drives, which are essential for progression and efficiency improvements.
- Exploration Aid: By using multiple Radar Towers, players can effectively map out and explore their entire world.
- Low Power Consumption: At only 30 MW, the power requirements are relatively low compared to the benefits it provides.
- Strategic Planning: The information provided by Radar Towers allows for better long-term planning of factory expansions and resource management.
Conclusion
Even though many players don’t think much about it, the Radar Tower is actually a really useful tool in Satisfactory. It helps you find important stuff like resources and special items, and shows you what’s around you. This makes it super helpful for planning your factory and exploring the world.
At first, it might seem like a lot of work to unlock and build Radar Towers. But in the long run, they’re totally worth it.
If you use Radar Towers in your game, you can manage your resources better, explore more easily, and build factories that are more organized and work better.
As the game keeps getting updated, like with the upcoming version 1.1, the Radar Tower will probably stay just as useful.
Whether you’ve been playing for a long time and want to make your factory better, or you’re new and trying to figure out the big world of Satisfactory, the Radar Tower is something you should definitely check out.