There’s a lot of things your PC does in the background.
Some processes manage the way peripherals interact with the computer and some take care of seamless internet connectivity, data sharing & related things.
And one such service is iphlpsvc or commonly known as IP helper service.
When you look closely into the task manager, you might find it to be the culprit for constantly hogging most of the CPU resources.
Thereby resulting in excessive lag while GAMING similar to GC Invoker Utility.
What Is Iphlpsvc Service?
Iphlpsvc is most commonly known as INTERNET PROTOCOL (IP) Helper Service in Windows. This service is used to make changes to the network configuration settings of your computer.
OK, great. But what it does actually?
It allows internet connections to your PC using different networking protocols like IPv6 and Port Proxy.
Unlike some third-party services, this one comes pre-installed with your Windows PC. And as you boot up the PC it runs automatically in the background.
Is It Safe to Disable Iphlpsv?
Iphlpsvc is mainly used for connecting over IPv6 or running remote databases. If you use your computer for some general tasks, for example, media viewing, gaming, or web browsing, this service is not important.
Besides, disabling IP Helper Service won’t have any DAMAGE to your system and doesn’t break the general functionality. But if you need to use the IPv6 protocol, please ensure this service is running. If this service eats up a ton of resources, you can choose to disable it.
Can You Disable iphlpsvc Safely?
Yeah! Definitely. Disabling iphlpsvc won’t damage your system or break your PC.
And even thinking that is PURE Stupidity.
If you’ve got a high-end PC with high system configurations, you won’t mind it running in the background. By doing so you would make the most out of the IPv6 protocol.
But what if you’ve got a low-end PC? It is already cramped up with system services, third-party services running in the background. You would want to disable as many unnecessary services as you can.
So, in that case, you’re left with the only option of disabling them. However, it’s not that easy as enabling/disabling of IH Helper service requires an expert-level workaround.
But don’t worry, I’ll share some easiest ways to stop the services running in the background.
How To Enable & Disable IP Helper Using Services
It isn’t that easy to disable IP Helper Services. However, I’ll do my best to explain all the easily so that even not so sharpest minds can disable the service themselves.
- Press the Start key on the keyboard and type Services to open the Services window.
- Scroll down and you’ll see the IP Helper option. Right-click on it to open the contextual menu
- Then select Stop to open a new dialog box where click OK to stop the service.
Now, that you’ve disabled the IP helper services, it’ll stay disabled until you reboot your computer. However, what if instead of disabling it temporarily, you want to disable them permanently?
There is a way. You can disable the IP helper services permanently using these 4 extra steps –
- Open the Services Window
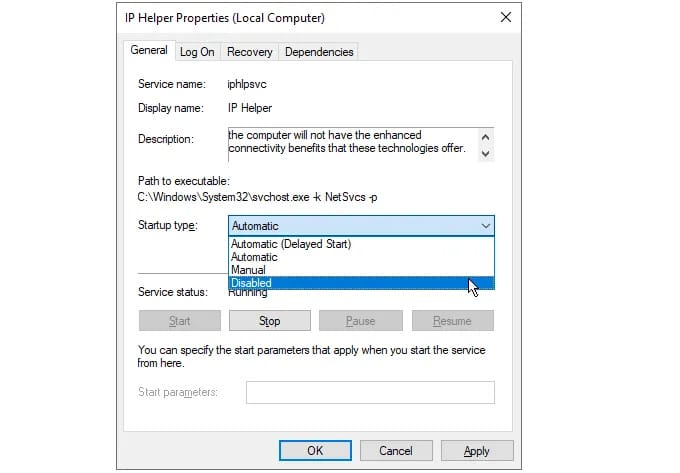
- Right-click on IP Helper and select Properties
- Select Disabled from the Startup type drop-down menu
- Select Apply or OK to save the change

Once done, the IP helper services will remain disabled even after reboots.
Restarting the IP Helper Service
All the steps mentioned above forces IP Helper to shut down.
But what if you need the Ipv6 service once again?
Well, then the only thing you can do is restart the IP Helper Service and it’s possible using these 4 steps –

- Once again press the search key & open the service windows.
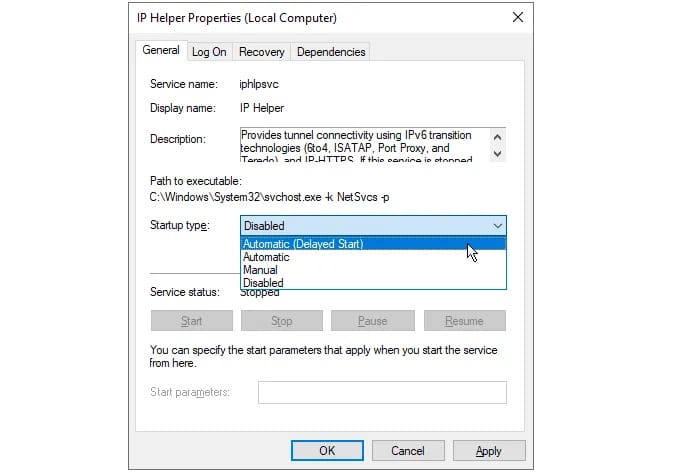
- Right-click on IP Helper and select Properties
- From the list of drop-down menus select Automatic.
- Select Apply or OK to save the change
That’s it. Now, reboot your computer to resume the iphlpsvc services back again.
And if you think it’s affecting the boot time of your PC, you can delay its boot time start-up by 1-2 minutes. Thereby loading the IP helper services only after the initial boot has completed.
How to Enable/Disable IP Helper Service using Registry Editor
If you’re unable to disable the IP Helper service using the traditional method, the only option you’re left with is via Windows Registry.
But WAIT!!!
Before you go ahead, make sure that you’re doing it right. Any kind of incorrect changes in registry keys may lead to damage to your PC. To stay on the safer side, I would recommend you to follow these steps carefully –
- Open Registry Editor by pressing ‘Win + R’, typing regedit, and clicking OK.
- Go to this exact path: HKEY_LOCAL_MACHINE\SYSTEM\CurrentControlSet\Services\iphlpsvc
- Double-click the Start key, change its Value data to 4, and click OK to save the change.

- Restart your computer, iphlpsvc is disabled. In case, you want to restart the service once again, change is value data back to 2.
How to Enable/Disable IP Helper Service using System Configuration
At last, I’ll use System Configuration settings to Enable/Disable IP Helper Service. Follow these steps to proceed –
- First, press the “WINDOWS + R” keys together to open the Run dialog box.
- Type “MSConfig” in it & press Enter.
- Once the System Configuration wizard opens up, head over to the Services tab.
- In the services tab, find IP Helper.
- Disable the IP helper by unchecking the box located near it.
- If you want to revert back to the original enabled state, check box the column beside the IP Helper option.
- Once done, Press the OK button to apply the changes.
- At last, reboot your PC to see change effectively.

Summary
By now you might have understood that there are some unnecessary processes in your Windows PC that suck up most of your PC resources.
Next time whenever your PC lags while playing games or doing some heavy tasks, do take a look over the processes running in the background. Disable those processes to make sure you get a seamless user experience every time you play a game. If that doesn’t boost up your PC, use these setting to optimize your Windows 10 PC for gaming.


