No one likes it…
✔When some programs start crashing down.
✔Or start using PC resources.
Especially when you’re in between gameplay.
So, today, it has become SUPER Important to optimize your PC for gaming. It’s not like I’m saying you go & get a new PC.
Instead, implement these PC tweaks to get optimum gaming performance.
How to Optimize Windows 10 For Gaming & Performance
Use SSD
Do you still use an HDD in your PC and wonder why it takes too much time to load a high-end pc game?
That’s happening because a HDD is way too much slower than an SSD. And even though, SSD won’t increase the speed of your pc drastically, it would certainly reduce the loading speed.
Look at this pic,

See the difference in boot speed when Windows 10 was booted from a HDD and an SSD Partition.
That’s not it.
If you’ve installed a game in SSD drive, it loads up way faster than HDD. A game that’s used to completely load in 30-40 seconds can load in 2-3 seconds. And for a gamer, this much difference can be a game-changer.
Clean up your Hard Disk
Right from the start. I have been recommending you use an SSD. But if you are still using a hard disk drive then make sure it isn’t bloated with your data and files.
Look at this picture –
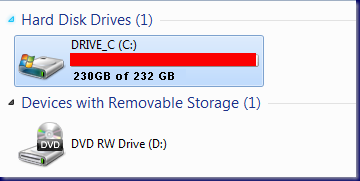
This could be slowing down your PC.
But what can you do to fix it and give your Windows 10 PC a speed boost?
Well, Windows 10 comes with a built-in storage manager called Storage chance.
You can use it to move your important file to a safer place, remove temporary files, Delete old junk files, recycled files, or files that you haven’t changed or used for a long time.
Enable Gaming Mode in Windows 10

Years after releasing Windows 10, Microsoft released a built-in Gaming Mode to optimize the operating system for gaming. You can enable it to get the most out of your PC resources. Follow these simple steps to enable the GAMING MODE.
- Press Windows key + I
- Type game mode
- Click Game Mode settings or Turn on Game Mode
- On the Gaming screen, click Game Mode
- Switch to ON to use Game Mode
This option is only available if you’re using the latest version of the operating system. Once enabled, the gaming mode will manage itself to reach the ideal frame rate.
Disable Unnecessary Startup Files
Have you ever encountered a scenario where you’ve TURNED ON your PC & you had to for like an Eternity?
This happens when you’ve installed too many apps & games on your PC. But the thing that’s causing the issue is unnecessary apps launching at startup.
You can disable those startup apps just like GC Invoker Utility using three efficient ways.
Fix Background Process
Recently I published a post where I had explained how an unnecessary WMI Provider Host process was eating up your all PC resources & that too without letting you know.
And when you play high-end games that require high PC resources, it becomes necessary to stop those hidden background processes from consuming high CPU, RAM.
But how would you do that?
Disabling that process or uninstalling that particular app the way?
Well, you can refer to my previous post where I’ve briefly explained all the necessary steps you must take to stop unknown process from consuming your PC resources.
Disable Automatic Updates
To play a high-end pc game, it’s important to have a fast & stable internet connection. Otherwise…
✅High-Ping
✅Unstable connection to the game server
… are some of the issues you may encounter while playing your favorite game.
But what if you’re on a high-speed broadband connection?
So, what could be the ISSUE?
This depends on multiple factors but most probably it’s WINDOWS UPDATE running in the background
When windows 10 was released, disabling automatic updates was next to impossible.
But in the latest update, Microsoft has provided a facility where you can schedule an update. Specify date & time & windows 10 will start updating your PC & that too without your permission.
Still, there are some chances that you would miss the scheduled update. So, in that case, I would recommend you update your Windows manually. And in the meanwhile, you can mark the connected network as metered.
Follow these steps to schedule a windows update –
- Open Settings with Windows + I’
- Click Update and Security in the Windows Update option.
- Look for Advanced options then click Update Options
- Disable Restart this device as soon as possible when a restart is required to install an update.
- Enable Show a notification (Windows will give plenty of warning when the system is going to restart following an update)
- Use Pause updates to delay the installation of updates for up to 35 days
By specifying when you’ll be using Windows 10, you can prevent Windows Updates from downloading and installing during active hours.
Set Power Plan to MAX
Power options are often ignored due to their supposedly negligible effect. Some gamers claim to adjust for higher performance works, while others fail to notice any difference changing their PC power settings.
The only way to know for sure is to test it out on your PC. To change your power settings:
- Open SETTINGS
- Type POWER
- Click > Power & sleep settings > Additional power settings
- Select the high-performance option
- If none is available, use Create a power plan to configure a new, custom power plan
This option will allow your PC to perform better at the cost of higher energy consumption and temperature levels. For this reason, it’s better to activate this Windows 10 optimization on the desktop rather than laptop PCs.
Stop OneDrive Sync
Look at this little icon in the TASKBAR –
Every time you install a Windows OS, it comes with OneDrive installed.
It’s cloud-based file storage by Microsoft that syncs your PC for files at a regular interval. And all this synching eats up your PC resources in the background. Ultimately impacting the overall performance of your PC.
TBH, with the trend of larger hard disks, you rarely need to start data online except for some important files.
Then why should you let it consume your PC resources?
I would recommend you disable OneDrive syncing to optimize your PC for gaming.
Clean out your Registry
Broken registries can slow down your PC. Not only PC, but this can also impact your overall gaming experience.
So, it’s important to clean out all the existing registries conflicting with your System. And you can that by reading my previous post where I had briefly explained & shared legitimate ways to fix the broken registries.
Final Words
If you want to optimize your PC for gaming, implement all these TWEAKS right away.
Once implemented, you’ll notice…
✅Fast boot time of your PC
✅Smooth gameplay.
✅No lag whatsoever.
✅Higher frame rates & lower ping.
… right away.
How was your experience after implementing all these tweaks?
Do let me know about them in the comments section given below.