When attempting to write data to a Steam disk, an error may indicate that the disk is write-protected. This problem can be resolved by using a different disk write utility to remove the write protection.
However, it’s not as easy as accessing steam purchase history. Some might find it difficult to avoid. So, I’m listing 9 expert ways using which you can fix the Steam Disk Write Error problem right away. Let’s get started:
Causes of a steam disk write error:
A Steam disk write error is an error that occurs when a game or software cannot save data to your computer’s hard drive. It can be caused by several factors, including but not limited to:
- First, your computer’s hard drive is full, and you try to save a game file.
- Next, you install a new game on Steam and attempt to play it without restarting Windows.
- Finally, you start a game before the installation is complete.
The game files are corrupted or missing (this could happen if the game crashes while saving).
There are many possible ways to fix this error, but the most common solution is restart Windows and rerun the game. You can also try deleting any files associated with the error message from your computer’s hard drive.
How to fix a steam disk write error.
A steam disk write error can be a frustrating experience, but there are a few ways to fix it.
Restart your computer
Sometimes the solution is as simple as restarting your PC. For example, if you’ve just installed a game and this error is popping up, try restarting your PC before diving into more complicated troubleshooting steps.
Keep the Steam client up to date.
The first step is to ensure that your Steam client is up to date. Open your Steam client by double-clicking the shortcut on your desktop or selecting it from the Start menu. Next, click on “Steam” in the top-left corner, then “Check for Steam Client Updates” in the drop-down menu with the client open.
Try Deleting ClientRegistry.blob file
Once you’ve made sure that your client is up to date, try deleting the ClientRegistry.blob file. Steam uses this file to store settings, and it can become corrupt or damaged over time. If you delete this file and restart your computer, a new one will be created automatically when you re-open your client.
To delete this file, open your File Explorer and navigate to “C:\Program Files (x86)\Steam.” Right-click on the ClientRegistry.blob file and select “Delete.” Restart your computer before opening Steam again
Verify your game files.

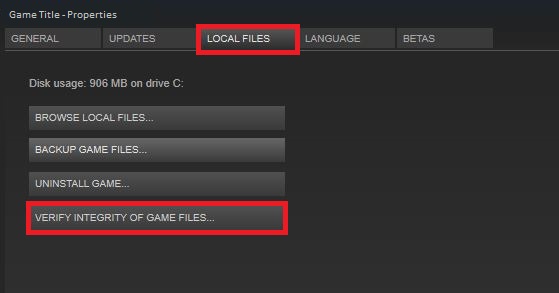
If updating your client doesn’t work, you can try verifying the integrity of your game files to make sure that they’re not corrupted. You can do this by following these steps:
- Open the ‘Library’ tab on the left side of your Steam window
- Right-click the game that’s giving you an error while launching and click ‘Properties.’
- Select the ‘Local Files’ tab on the Properties window and click ‘Verify Integrity of Game Files…’
If the integrity of game files checks out, you can try to apply the next fix.
Verify Hard Drive Errors Using Chkdsk Utility
Check if there are any errors on your hard drive by running the chkdsk utility in Windows. First, open the command prompt by pressing Windows Key + X and selecting “Command Prompt” from the menu. Next, type in chkdsk C: /F /R (replacing C with the letter of your hard drive). This will check for errors on your hard drive and should take about 5 minutes. After it finishes, reboot your computer and see if that fixes anything.
Check for conflicting software.
When installing new software on your computer, it is essential to check for conflicts with other software already installed. Often, installing new software can cause problems with existing software, leading to system crashes and other issues. To avoid these problems, it is essential to check for conflicts before installing any new software.
There are a few ways to check for conflicts. One way is to use the Windows “Programs and Features” tool. This tool allows you to see all of the software installed on your computer, and it also shows you any conflicts that may exist between different programs. Another way to check for conflicts is to use a program called “SFC.” This program scans your computer for any potential problems caused by conflicting software, and it will fix any issues that it finds.
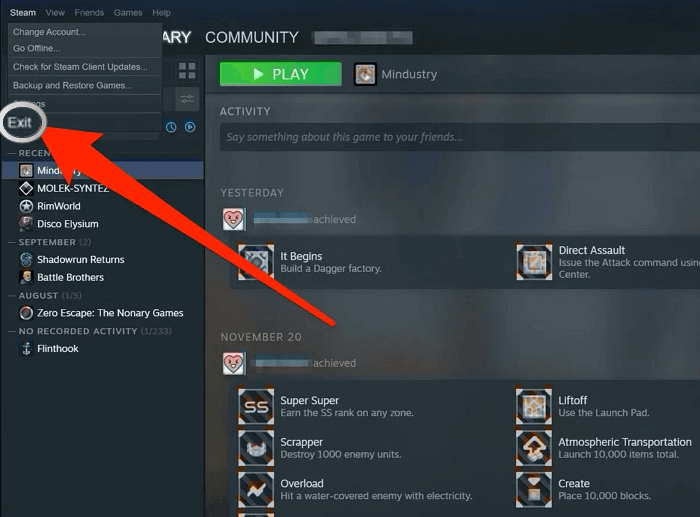
Restart the Steam client.

1. Close the Steam application and re-open it.
2. Click the Steam tab in the top left corner of the window and select Settings from the drop-down menu, then click Downloads and Clear Download Cache.
3. Restart your computer and relaunch Steam, then try to download or play your game.
Move Installed Games to a New Folder
Try creating another folder on your computer and moving all your evergreen steam games over to it. To do this, you will need to go into Steam’s settings by clicking on “Steam” in the upper left corner and then selecting “Settings.” In the window that appears, click on “Downloads” in the upper-left corner and then select “Steam Library Folders.” Next, click on “Add Library Folder,” create a new folder for your games and then move them into it. Restart Steam after doing so.
Whitelist Steam App from the Anti-Virus

If you have issues with your anti-virus software preventing you from launching the Steam application, you can add the Steam application to your whitelist. This will tell your anti-virus software that the Steam application is safe and should not be blocked. To do this, open your anti-virus software and go to the “Whitelist” tab. Next, click on “+” and add the path to your Steam application folder, and you’re done.
Conclusion
I hope these 9 solutions are enough for you to get rid of this Steam Disk Write Error.
However, despite doing all this, if you’re still getting this error, do let us in the comments section given below.
That’s all for now.
If you found this article to be helpful, do share it with others facing the issue. In the meanwhile, also check out the list of PC Gaming Soon on Steam.


